About
23 August 2021
Compact System Designed for High-Precision, Robot-Based Surface Measurements
System poised to enable real-time, in-line 3D inspection and boost efficiency of high-tech manufacturing
WASHINGTON — Researchers have developed a lightweight optical system for 3D inspection of surfaces with micron-scale precision. The new measurement tool could greatly enhance quality control inspection for high-tech products including semiconductor chips, solar panels and consumer electronics such as flat panel televisions.
Because vibrations make it difficult to capture precision 3D measurements on the production line, samples are periodically taken for analysis in a lab. However, any defective products made while waiting for results must be discarded.

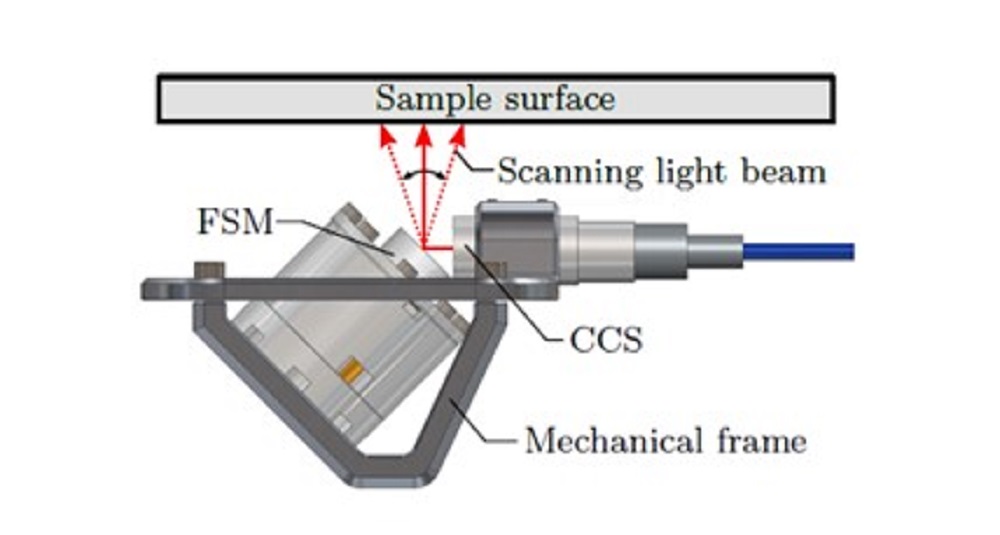
Caption: To create a system that can take measurements in the vibration-prone environment of an industrial manufacturing plant combined a compact 2D fast steering mirror (FSM) with a high precision 1D confocal chromatic sensor (CCS). The FSM is used to manipulate the optical path of the sensor, scanning the measurement spot quickly and precisely across the surface area of interest.
Credit: Daniel Wertjanz, Christian Doppler Laboratory for Precision Engineering for Automated In-Line Metrology
To create a system that could operate in the vibration-prone environment of an industrial manufacturing plant, researchers headed by Georg Schitter from Technische Universität Wien in Austria combined a compact 2D fast steering mirror with a high precision 1D confocal chromatic sensor.
“Robot-based inline inspection and measurement systems such as what we developed can enable 100% quality control in industrial production, replacing current sample-based methods,” said Ernst Csencsics, who co-led the research team with Daniel Wertjanz. “This creates a production process that is more efficient because it saves energy and resources.”
As described in The Optical Society (OSA) journal Applied Optics, the new system is designed to be mounted on tracking platform placed on a robotic arm for contactless 3D measurements of arbitrary shapes and surfaces. It weighs just 300 grams and measures 75 x 63 x 55 millimeters cubed, which is about the size of an espresso cup.
“Our system can measure 3D surface topographies with unprecedented combination of flexibility, precision, and speed,” said Wertjanz, who is pursuing a PhD on this research topic. “This creates less waste because manufacturing problems can be identified in real-time, and processes can be quickly adapted and optimized.”
From lab to fab
Precision measurements are usually performed with bulky instruments in the lab. To bring this capability to the production floor, the researchers developed a system based on a 1D confocal chromatic distance sensor developed by Micro-Epsilon, a partner on this research project. Confocal chromatic sensors can precisely measure displacement, distance and thickness using the same principles as confocal microscopes but in a much smaller package.
They combined the confocal sensor with a highly integrated fast steering mirror they previously developed that measured just 32 millimeters in diameter. They also developed a reconstruction process that uses the measurement data to create a 3D image of the sample’s surface topography. The 3D measurement system is compact enough to fit on a metrology platform, which serves as connection to a robotic arm and compensates for vibrations between sample and measurement system through active feedback control.

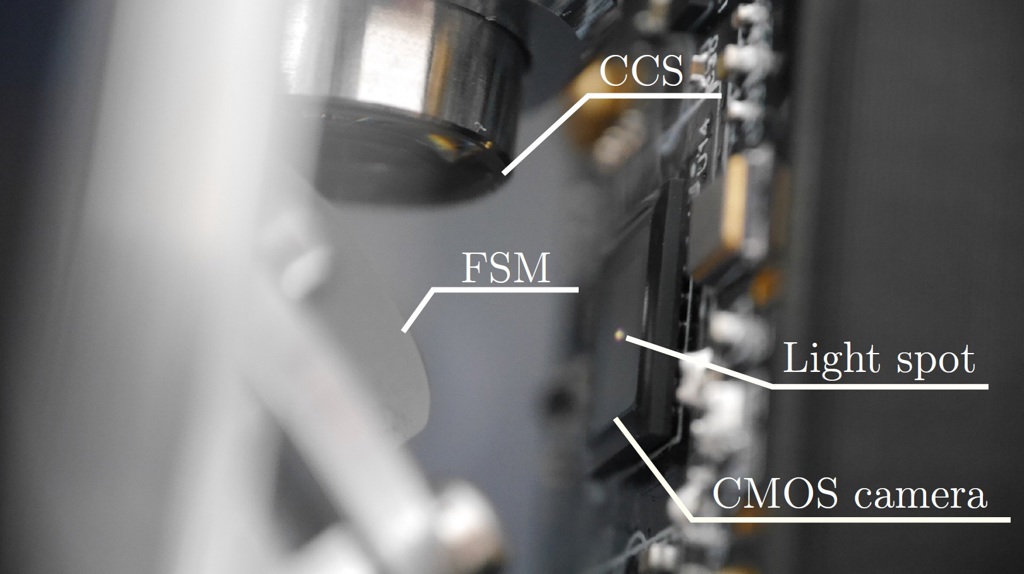
Caption: The image shows the new system during a calibration process that involves a CMOS camera. The light spot where measurements are acquires as well as the fast-steering mirror (FSM) and confocal chromatic sensor (CCS) can be seen.
Credit: Daniel Wertjanz, Christian Doppler Laboratory for Precision Engineering for Automated In-Line Metrology
“By manipulating the optical path of the sensor with the fast-steering mirror, the measurement spot is scanned quickly and precisely across the surface area of interest,” said Wertjanz. “Because only the small mirror needs to be moved, the scan can be performed at high speeds without compromising precision.”
To test the new system, the researchers used various calibration standards featuring structures with defined lateral sizes and heights. These experiments demonstrated that the system can acquire measurements with a lateral of 2.5 microns and axial resolution of 76 nanometers.
“This system could eventually bring a variety of benefits to high-tech manufacturing,” said Wertjanz. “In-line measurements could enable zero-failure production processes, which are especially useful for low-volume fabrication. The information could also be used to optimize the manufacturing process and machine tools settings, which can increase overall throughput.”
The researchers are now working to implement the system on the metrology platform and incorporate it with a robotic arm. This will allow them to test the feasibility of robot-based precision 3D measurements on freeform surfaces in vibration-prone environments such as an industrial production line.
Paper: D. Wertjanz, T. Kern, E. Csencsics, G. Stadler, G. Schitter, “Compact scanning confocal chromatic sensor enabling precision 3-D measurements,” Applied Optics, 60, 25, 7511-7517 (2021).
DOI: https://doi.org/10.1364/AO.428374
About Optica Publishing Group
Optica Publishing Group is a division of the society, Optica, Advancing Optics and Photonics Worldwide. It publishes the largest collection of peer-reviewed and most-cited content in optics and photonics, including 18 prestigious journals, the society’s flagship member magazine, and papers and videos from more than 835 conferences. With over 400,000 journal articles, conference papers and videos to search, discover and access, our publications portfolio represents the full range of research in the field from around the globe.
About Optical Materials Express
Optical Materials Express is an open-access journal focusing on the synthesis, processing and characterization of materials for applications in optics and photonics. It is published by Optica Publishing Group and emphasizes advances in novel optical materials, their properties, modeling, synthesis and fabrication techniques; how such materials contribute to novel optical behavior; and how they enable new or improved optical devices. The Editor-in-Chief is Andrea Alù from City University of New York, USA. For more information, visit Optical Materials Express.
About The Optical Society
The Optical Society (OSA) is dedicated to promoting the generation, application, archiving, and dissemination of knowledge in optics and photonics worldwide. Founded in 1916, it is the leading organization for scientists, engineers, business professionals, students, and others interested in the science of light. OSA’s renowned publications, meetings, online resources, and in-person activities fuel discoveries, shape real-life applications and accelerate scientific, technical, and educational achievement.
About Optical Materials Express
Optical Materials Express is an open-access journal focusing on the synthesis, processing and characterization of materials for applications in optics and photonics. It is published by Optica Publishing Group and emphasizes advances in novel optical materials, their properties, modeling, synthesis and fabrication techniques; how such materials contribute to novel optical behavior; and how they enable new or improved optical devices. The Editor-in-Chief is Andrea Alù from City University of New York, USA. For more information, visit Optical Materials Express.
Media Contact
